
 I like CW. I like the music of the code, the ability to communicate with basic and even low cost equipment and the joy of building some of the radios I use for CW.
I also like EASY!
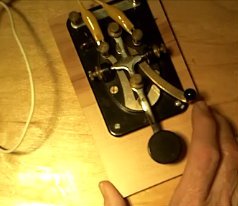
My Icom 7200 is my primary rig at home and like many other entry/mid-range radios the key jack is in the back of the radio making it inconvenient to change keys. Reaching for my “junk/parts/scrap/don’t really know what some of this stuff is box; a quick search revealed everything needed to easily build a simple switch that would allow quick selection between key and paddle. Of course you can use the same thing if you have more than one key and switch between your favorite keys.
I only had a DPDT switch and was limited to two selections for inputs, however a rotary switch would work just as well and you could then switch between several selections.
Take a look at the video, it explains everything.
Hope to meet you on the air soon.
73 de John/W5CYF
For more interesting videos concerning ham radio, Morse code, kit building and QRP Portable operations, check out my YouTube Channel:
Over the past couple of weeks, two viewers of my YouTube channel have asked me if I thought a paddle or key was the best to learn on. So…I guess I’ll go ahead and enter the fray (or war zone) concerning this often asked question.
First a qualifier. For those of you that follow my video or blog you most likely already know that I am only a ‘rank’ beginner when it comes to Morse code (CW) and by no means an expert. But that’s never stopped anyone from offering an opinion before!
 In a nutshell, key or paddle is not that important for learning. Pick what ever you want and get on the air. If you start slow; so what? Just keep going you’ll get better regardless of key or paddle choice.
For more in-depth remarks check out my two videos “Learning CW – Key VS Paddle Part 1 & 2.” I try to cover frequently asked questions and give some tips for setting your keys/paddles.
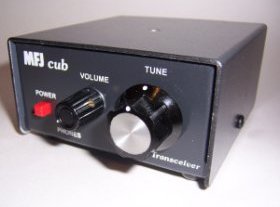
Thanks to Bill (WX4AR) for leaving a comment on my YouTube series covering the building of the MFJ Cub stating that it may be a possibility the Cub was actually a mislabeled 40 meter version. That got me to thinking that I should try my frequency counter again.
Previous to this, I was looking for a signal within a narrow range when, in fact, the frequency counter was showing the transmit frequency was way off. After a brief tuning on one of the ‘cans’, the Cub came to life.
 Now I’ve got another nice little QRP rig to add to the stable.
Bottom line…don’t overlook the obvious when troubleshooting. I learned my lesson (I hope)
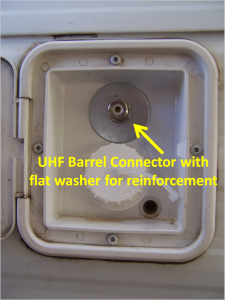
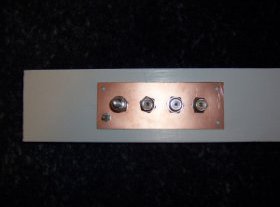
After putting off making a window pass through for my coax, today I bit the bullet and got ‘er done. Pretty much was an easy project requiring very little investment and time.
Parts included a ¾ X 3 pine board cut to length to properly fit the window opening, a bit of one-sided PC board, some 2 inch coax barrel connectors and some flat washers, wood screws, a bolt and nut and some foam insulation.
As mentioned construction was quick and easy. I used a 9/16 step drill to drill the PC board and a 5/8 drill for the wood in order to allow for slight expansion and contraction of the board. The larger holes also made for easier alignment of the barrel connectors.
While I could have easily used a file to enlarge the holes in the washers, I used my metal lathe to make quick work of that job. Now they are a tight fit give some surface area to the back of the pine wood.
A 10-24 X 1 inch metal screw is used to attache a ¾ copper plated plumber’s strap that will be used for ground. I am fortunate that the meter box is only a few short feed from the window entrance so I can terminate the ground strap directly to the meter.
This is my kind of project, it combined woodworking, metal working, and ham radio. What a great combination!
 Hope to meet you on the air soon.
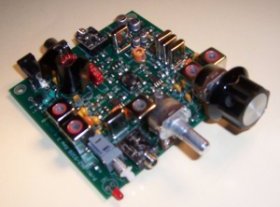
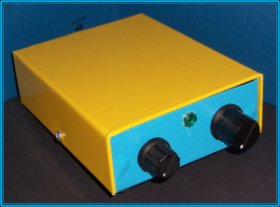
If you’ve been following this blog for a while, you likely know I really enjoy kit building. One kit that’s been on the radar for years is the MFJ Cub, specifically the 20 meter version. Recently, I had an opportunity to get one off eBay for a reasonable price. The kit was complete and just like new.
Building was straight forward, all one needs to do is add about 25 through-hole discrete parts since the remainder are SMP and already installed by the good folks at MFJ.
The only thing that I would I have liked better was the board did not take solder as well as other kits I’ve built. I’ll chalk that up to the possibility of MFJ using lead free solder during the manufacturing process. Because of the slight difficulty with soldering, some joints took a time or two before they looked OK.
Ready for the smoke-test! Smoke-test failed :( I connected everything to the rig, including watt meter. Power out is 1.25 watts, but no side tone, no cw tone set and receiver hears nothing.
Anyone out there have any idea where to start looking? This kit has a pretty good reputation so I suspect it operator error.
Let me know what you think. There’s a YouTube video of the building series.
INTERESTING VIDEO


Share this Post
latest post
-
 Ham Radio Manufacturers June 25, 2026
 -
 Ham Radio battery backup June 15, 2026
 -
 Amateur Radio Internet June 5, 2026
 -
 Amateur Radio pictures May 26, 2026
 -
 Linux Ham Radio Software May 16, 2026
 -
 Baltimore Amateur Radio Club May 6, 2026
 -
 Ham Radio Packet Software April 26, 2026
 -
 Ham Radio General Class Study Guide April 16, 2026
 -
 Amateur Radio gear March 31, 2026