 Simple, inexpensive and lots of fun! Here is an easy to make home brew antenna that can get you on the air working satellites or be built for use as a portable hand held antenna to extend the range of your HT.
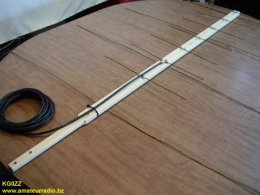
It's a dual band 2m/70 cm yagi antenna made with common materials and cost very little to make. Also, the antenna is fed with only one coaxial cable and does not use a duplexer.
For many decades radio amateurs have built antennas with wood and wire and have had great success using their home brew creations. This antenna was built in the same tradition and I am pleased to say that I made my first satellite contact using such an antenna.
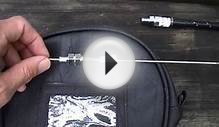
To make this antenna I only needed to buy just a couple of items. Everything else I had on hand. I had to buy the wood for the boom, two 1-1/4" long machine screws (although I bought 4 total) and a package of small wire nuts to place on the ends of the elements just for a bit of safety. Since I already had the screws, coax and connectors I spent less than $4.00 to make this antenna. I have well gotten my money's worth out of it and have thoroughly enjoyed using it!
Construction & Materials
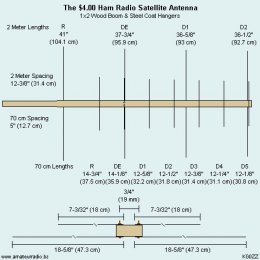
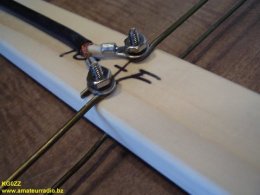
The antenna is made with a 1x2 pine/spruce furring strip for use as a boom and steel coat hangers for antenna elements. I used two trim screws to hold each parasitic element in place and stainless steel #6 machine screws with matching hardware for the driven elements.
 Although the dimensions shown in the diagram are for use with steel coat hangers, you can experiment with other materials such as welding rods, stainless steel rods, etc.
The first step was to mark the boom for the elements using a tape measure and a carpenter's square. Some planning ahead of time on paper allowed me to make room for an extra 70 cm director just past the last 2 meter director.
In starting from scratch I began by marking the 2 meter elements on the straightest 1 x 2 x 8' long furring strip that I could find from the lumber yard. An equal spacing of 12-3/8" is what I used for the 2 meter band so that I could add an extra director to give the antenna a little extra gain over a three element yagi and still have a fairly short antenna. That would make the 2 meter yagi antenna length just over three feet long not including the handle.
At first I marked five 2 meter elements on the boom instead of four but after thinking about it I decided that the extra mark was a good spot to cut off the boom. This made the wood boom 50-3/4" (128.9 cm) long.
 Starting from the director end of the boom mark the boom as follows. A mark at 1-1/4", 13-5/8", 26", 38-3/8", and 50-3/4" (3.2 cm, 34.6 cm, 66 cm, 97.5 cm & 128.9 cm).
Use a carpenter's square and mark a straight line across the boom at each mark. This will also help to square the coat hanger elements. Cut the boom off at the 50-3/4" (128.9 cm) mark.
Also along each line, mark the center of the boom. Doing this will simplify adding the elements.
Flip the board over, and again starting with the director end of the boom, mark the 70 cm elements as follows. A mark at 1", 6", 11", 16", 21", 26" and 31" (2.5 cm, 15.2 cm, 27.9 cm, 40.6 cm, 53.3 cm, 66 cm & 78.7 cm). After using the square to mark a line across the board, mark the center of the boom along each line.
The next step in preparing the boom is to mark the two holes for the feed-point. The feed-point is located at the 26" (66 cm) mark on the boom. From the center mark on the boom, measure out 3/8" (9.5 mm) in both directions and mark for drilling two holes. The spacing between the two marks should end up being 3/4" (19 mm) apart. If you are using #6 hardware then drill two 9/64" holes through the boom to attach the dipole elements.
INTERESTING VIDEO


Share this Post
latest post
-
 Ham Radio Manufacturers June 25, 2026
 -
 Ham Radio battery backup June 15, 2026
 -
 Amateur Radio Internet June 5, 2026
 -
 Amateur Radio pictures May 26, 2026
 -
 Linux Ham Radio Software May 16, 2026
 -
 Baltimore Amateur Radio Club May 6, 2026
 -
 Ham Radio Packet Software April 26, 2026
 -
 Ham Radio General Class Study Guide April 16, 2026
 -
 Amateur Radio gear March 31, 2026